Spring(一)
Spring
一、IOC理论
对于新增或修改业务,不需要修改代码。只需要修改配置文件,
二、实例化容器
bean骨架
<?xml version="1.0" encoding="UTF-8"?>
<beans xmlns="http://www.springframework.org/schema/beans"
    xmlns:xsi="http://www.w3.org/2001/XMLSchema-instance"
    xsi:schemaLocation="http://www.springframework.org/schema/beans
        http://www.springframework.org/schema/beans/spring-beans.xsd">

    <bean id="..." class="...">
        <!-- collaborators and configuration for this bean go here -->
    </bean>

    <bean id="..." class="...">
        <!-- collaborators and configuration for this bean go here -->
    </bean>

    <!-- more bean definitions go here -->

</beans>
三、IOC创建对象方式
1、默认使用无参构造创建
2、使用有参构造
1、下标赋值
<bean id="user" class="com.promefire.injection.User">
        <!-- collaborators and configuration for this bean go here -->
        <constructor-arg index="0" value="桥边红药"/>
</bean> 2、类型赋值
<bean id = "user" class = "com.promefire.injection.User">
        <constructor-arg type="java.lang.String" value=" (Type赋值)桥边红药"/>
    </bean>
不建议使用,可能会有多个相同类型的变量
3、参数名
<bean id = "user" class = "com.promefire.injection.User">
        <constructor-arg name="name" value="promefire"/>
    </bean>
配置文件加载的时候,容器中管理的对象已经被初始化
不能忘记写有参构造函数,否则会报错
@Test
    public void text1() {
        ApplicationContext context = new ClassPathXmlApplicationContext("Userbeans.xml");
        User user = (User) context.getBean("user");
        //User user = context.getBeans("user",User.class);
        //可以省去强转类型
        System.out.println(user);
    }
四、Spring 配置
1、别名
五、依赖注入DI
1、构造器注入
2、set注入
基于 setter 的 DI
3、拓展注入
需要加入xml依赖
P命名空间注入(proprety)
xmlns:p="http://www.springframework.org/schema/p"

<bean id="user" class="com.promefire.injection.User" p:name="桥边红药" p:age="18"/>
C命名空间注入(construct)
 xmlns:c="http://www.springframework.org/schema/c"

<bean id="user2" class="com.promefire.injection.User" c:name="promefire" c:age="20" />
4、bean生命周期
单例模型(默认):scope
<bean id="user" class="com.promefire.injection.User" p:name="promefire" p:age="18" scope="singleton"/>原型模式 :每次从容器中取出一个对象,都是一个新的对象
<bean id="user" class="com.promefire.injection.User" p:name="promefire" p:age="18" scope="prototype"/>六、自动装配
1、在xml中显示的配置
2、在Java中显示的配置
3、隐式的自动装配bean
1、Byname
会自动在容器上下文寻找与自己对象set方法后面的值对应的bean id
<bean id="people" class="com.promefire.pojo.People " autowire="byName" />必须名字唯一
2、ByType
会自动在容器上下文寻找与自己对象set方法对象属性类型相同的bean
<bean id="people" class="com.promefire.pojo.People " autowire="byType" />必须类型唯一
3、使用注解实现自动装配
@Autowired注解
1、导入约束
2、配置注解的支持:context:annotation-config/
<?xml version="1.0" encoding="UTF-8"?>
<beans xmlns="http://www.springframework.org/schema/beans"
    xmlns:xsi="http://www.w3.org/2001/XMLSchema-instance"
    xmlns:context="http://www.springframework.org/schema/context"
    xsi:schemaLocation="http://www.springframework.org/schema/beans
        http://www.springframework.org/schema/beans/spring-beans.xsd
        http://www.springframework.org/schema/context
        http://www.springframework.org/schema/context/spring-context.xsd">

    <context:annotation-config/>

</beans>
public class People {
@Autowired
private Cat cat;
@Autowired
private Dog dog;
private String name;属性前加@Autowired注解可以省略setter()方法,前提是属性在IOC容器中存在且名字相同
public class People {
    @Autowired(required = false)
    private Cat cat;
    @Autowired
    @Qualifier("dog111")//显示地指定一个id
    private Dog dog;
    private String name;
自动装配环境比较复杂时,可以用Qualifier(“XXX”)配合Autowired使用
@Resource注解
public class People {
    @Resource(name = "cat2")
    private Cat cat;
    @Resource
    private Dog dog;
    private String name;
@Resource和@Autowired比较:
- 都是用来自动装配,都可以放在属性字段上
- @Autowired 默认先使用byType,必须要求这个对象存在
- @Resource 默认ByName,找不到就用ByType实现,还找不到,报错
七、使用注解开发
1、开启注解约束,
2、扫描包,使该包下注解生效
1、bean
2、属性如何注入
@Component
public class User {
    //等价于<bean id="user" class="com.promefire.dao.User">
    //        <property name="name" value="桥边红药"/>
    //    </bean>
    //@Value("桥边红药")
    public String name ;

    @Value("桥边红药")
    public void setName(String name) {
        this.name = name;
    }
}
3、衍生的注解
4、自动装配
- @Autowired:自动装配,通过类型,名字
- 如果不能唯一指定,需要@Qualifier(“xxx”)显示指定一个id
- @Nullable :该字段可以为null
- @Resource: 自动装配,通过名字,类型
5、作用域
- @Scope(“singleton”)
- @Scope(“prototype”)
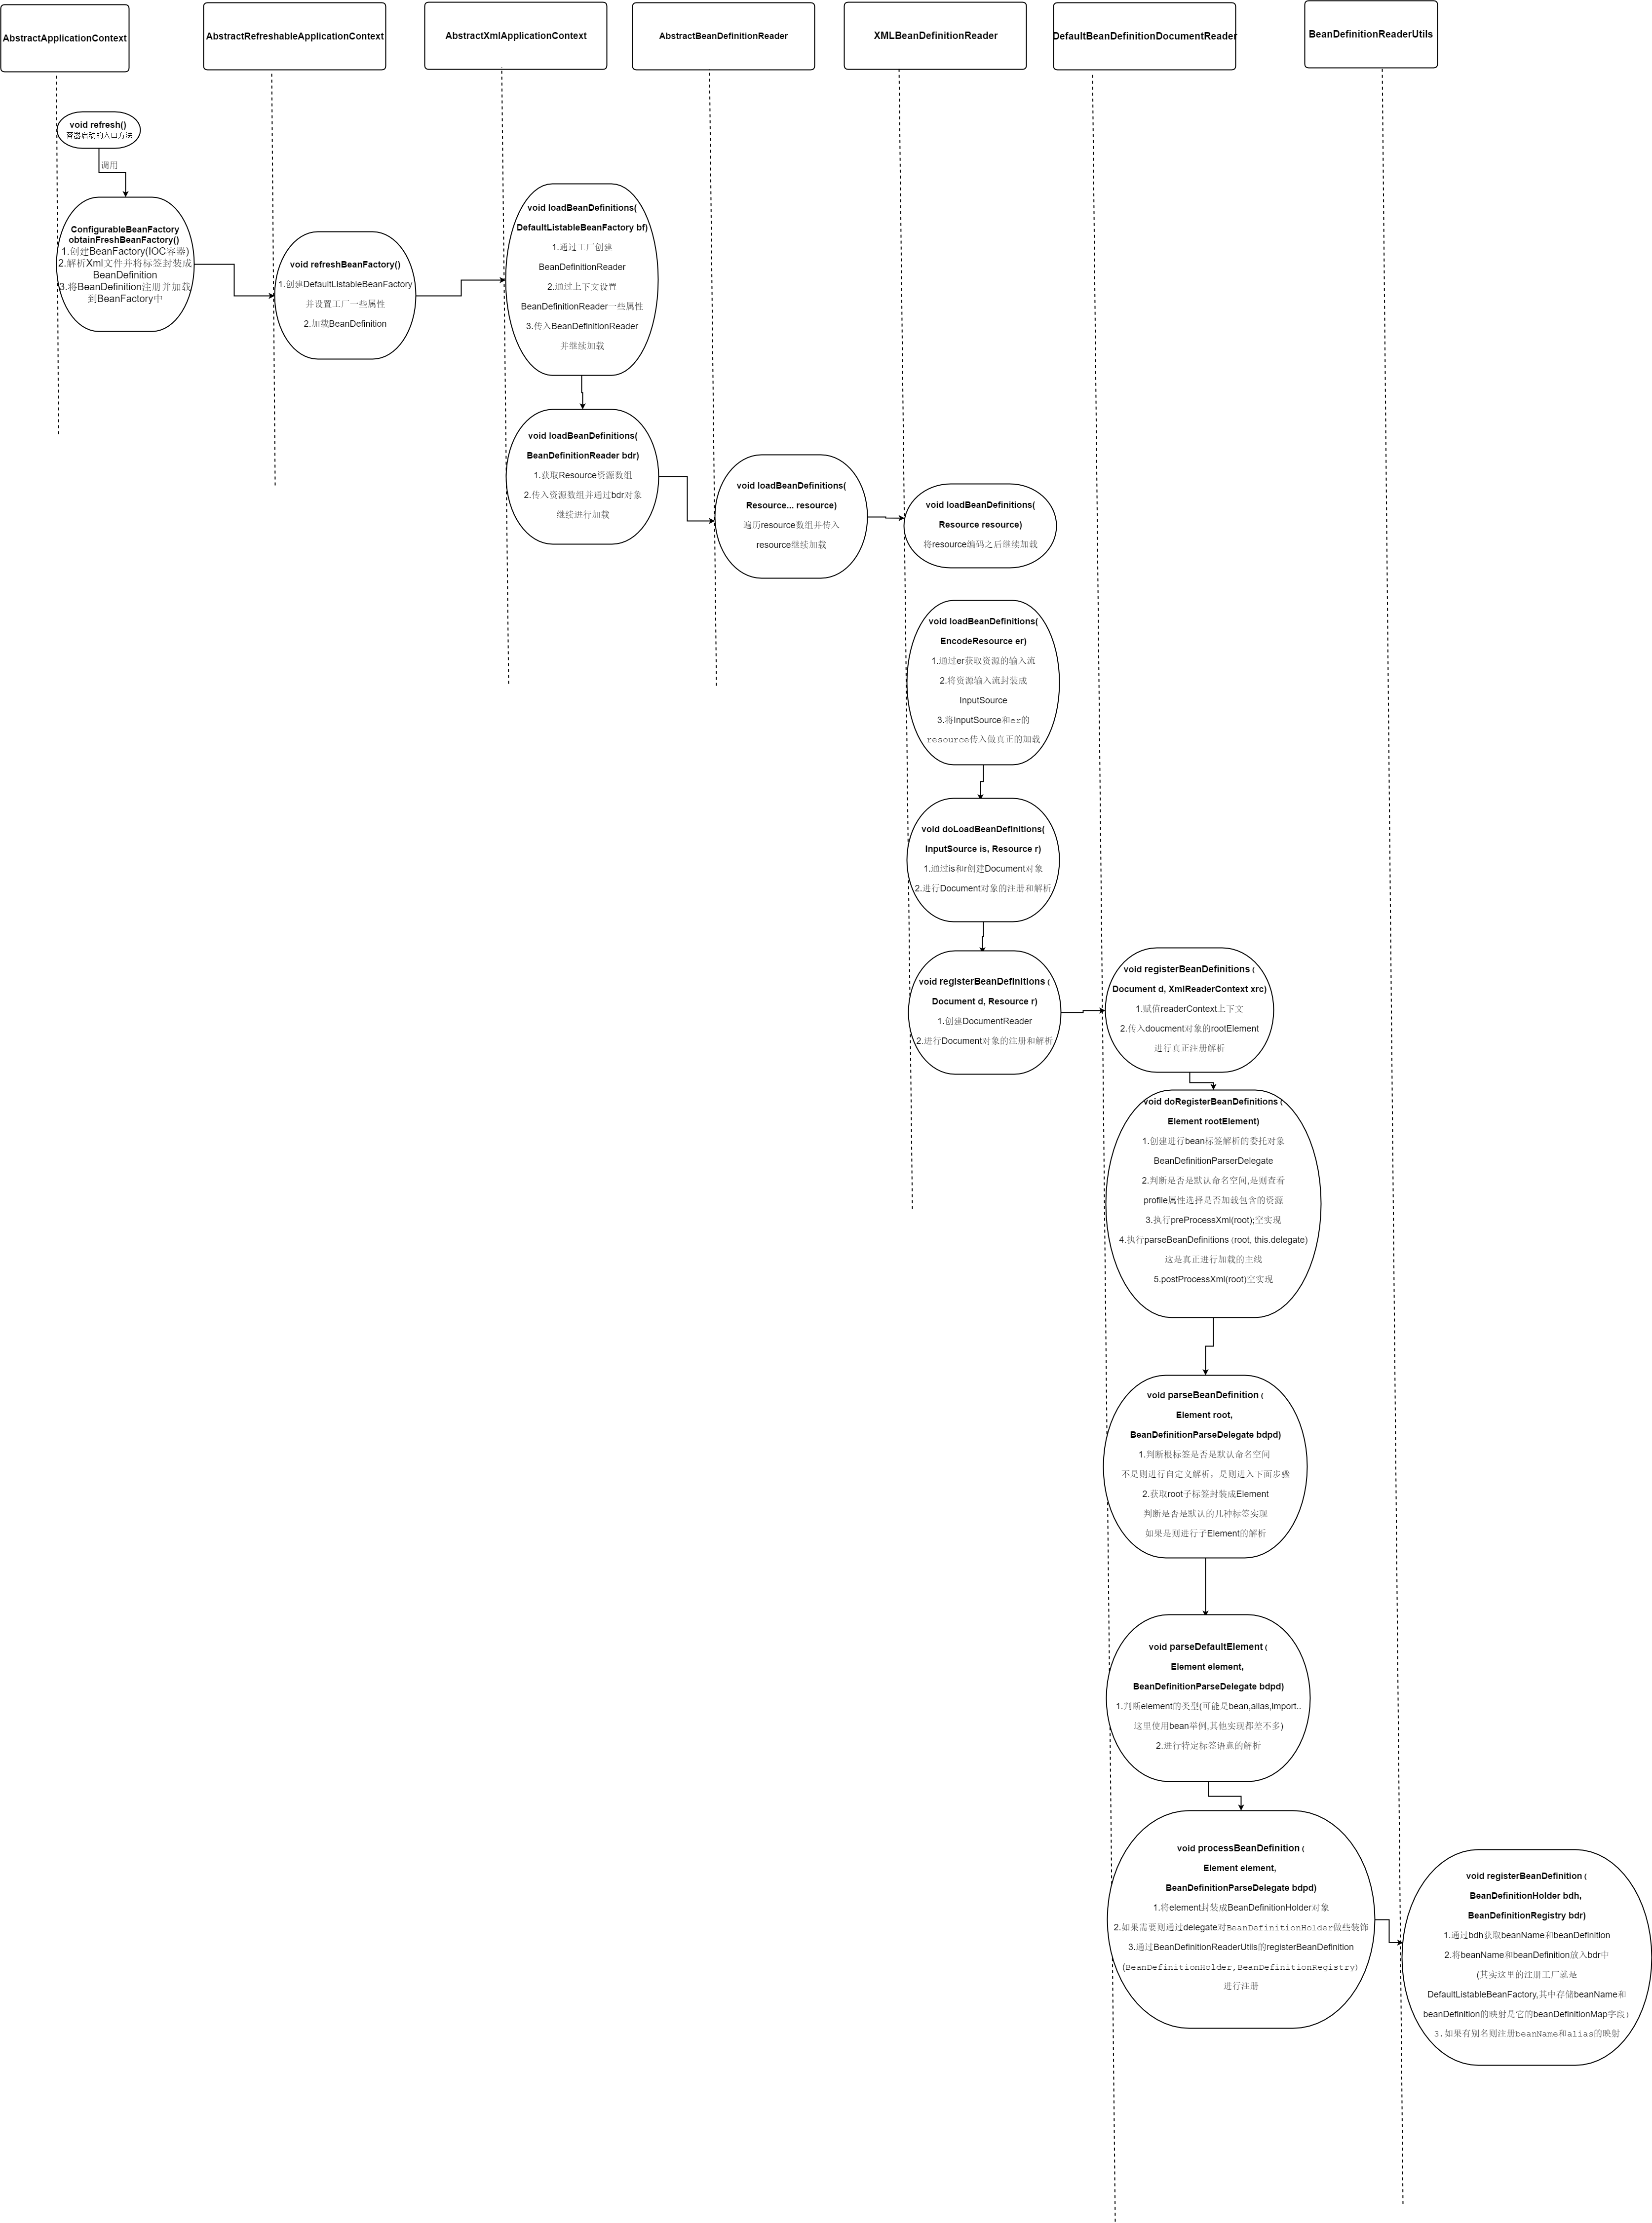
八、流程
SpringIOC启动流程
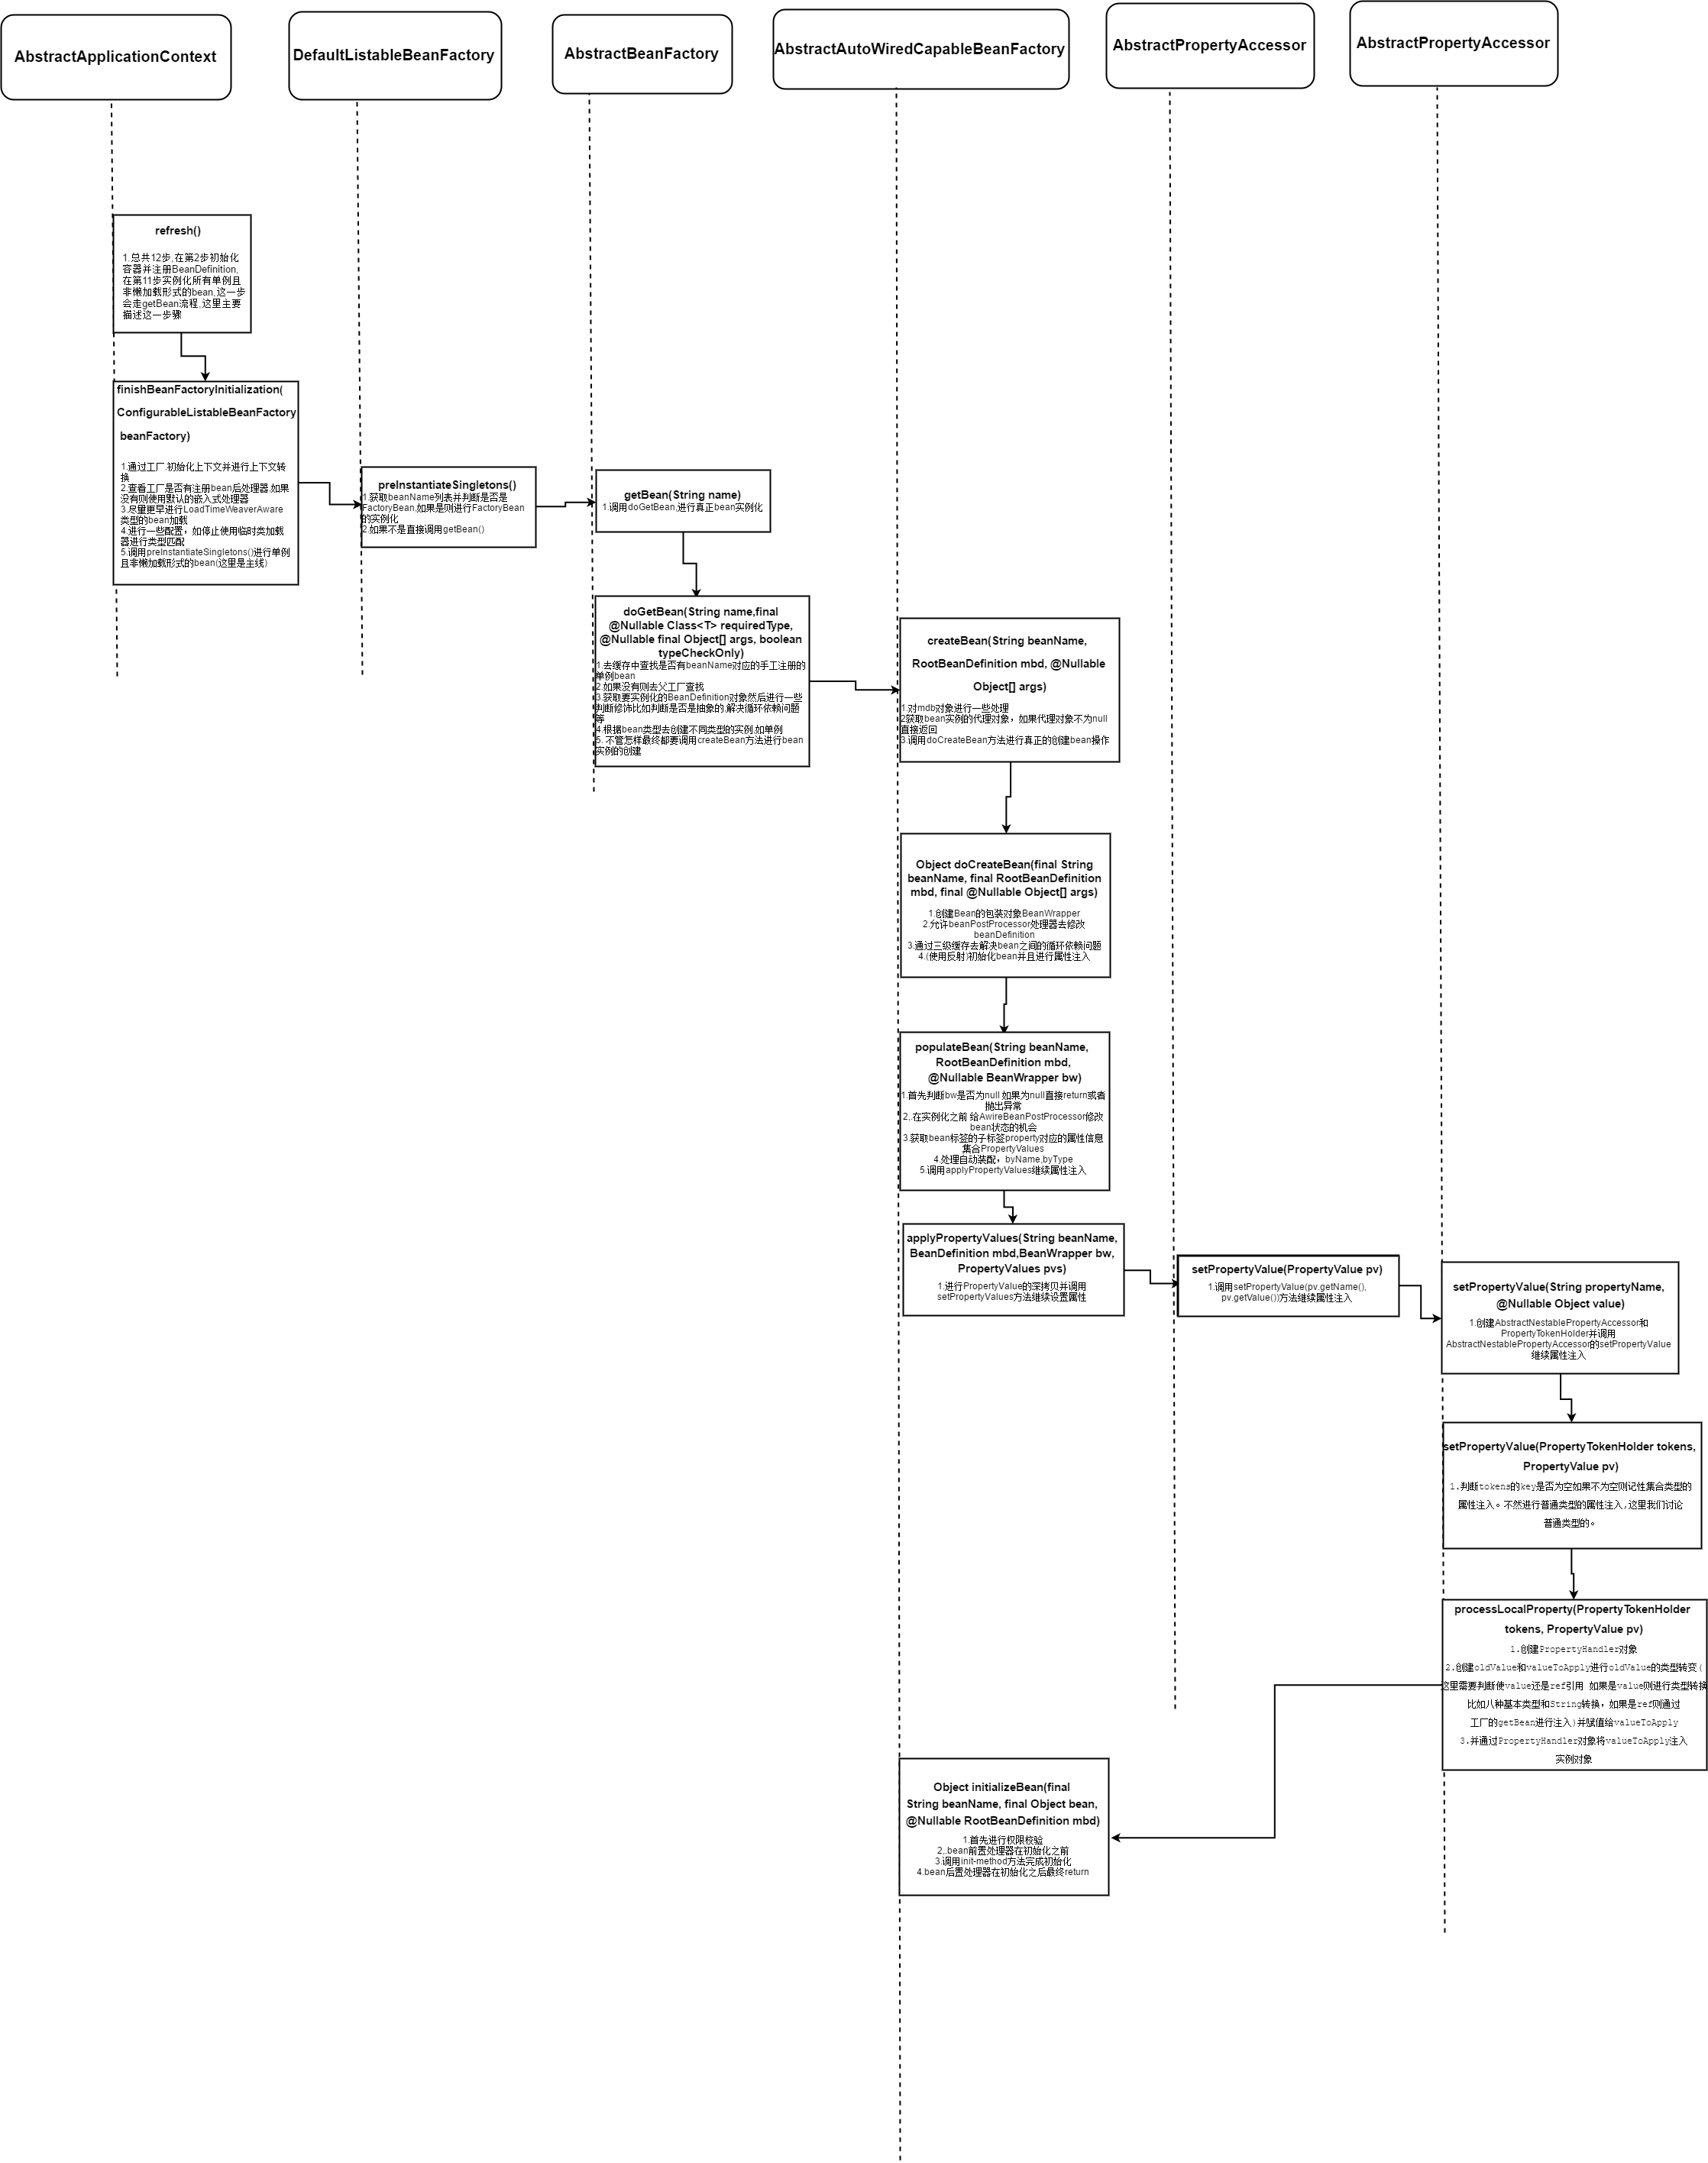
IOC容器启动主线
文档注释
| 应用场景 | 注解 | 注解说明 |
|---|---|---|
| 处理请求 | @Controller | 处理 Http 请求 |
| 处理请求 | @RestController | @Controller 的衍生注解 |
| 路由请求 | @RequestMapping | 路由请求 可以设置各种操作方法 |
| 路由请求 | @GetMapping | GET 方法的路由 |
| 路由请求 | @PostMapping | POST 方法的路由 |
| 路由请求 | @PutMapping | PUT 方法的路由 |
| 路由请求 | @DeleteMapping | DELETE 方法的路由 |
| 请求参数 | @PathVariable | 处理请求 url 路径中的参数 /user/{id} |
| 请求参数 | @RequestParam | 处理问号后面的参数 |
| 请求参数 | @RequestBody | 请求参数以json格式提交 |
| 返回参数 | @ResponseBody | 返回 json 格式 |
- 依赖:spring-webmvc
<!-- https://mvnrepository.com/artifact/org.springframework/spring-webmvc -->
<dependency>
    <groupId>org.springframework</groupId>
    <artifactId>spring-webmvc</artifactId>
    <version>5.2.9.RELEASE</version>
</dependency>
快捷键
Ctrl+Alt+V:生成变量名
psvm:main函数
sout:输出
Alt + Enter:强制类型转换
Ctrl + /: 注释
Ctrl + SHift + /:块注释
踩坑
<bean id="hello" class="com.promefire.Hello">
        <property name="str" value="Spring"/>
    </bean>
name 后面的值 要与Hello类中变量相同
id = 变量名 class = new的对象
Hello hello = new Hello()
property 给对象中的属性设置一个值